After a ticket is submitted by a customer, the first thing you need to do is give them an answer or a solution. You can do it through the Comment box of eHelpdesk.
Go to a ticket, you will see all the comments that have been posted previously, or the “No comments” will display if no one has commented on the ticket yet.
Ticket Detail
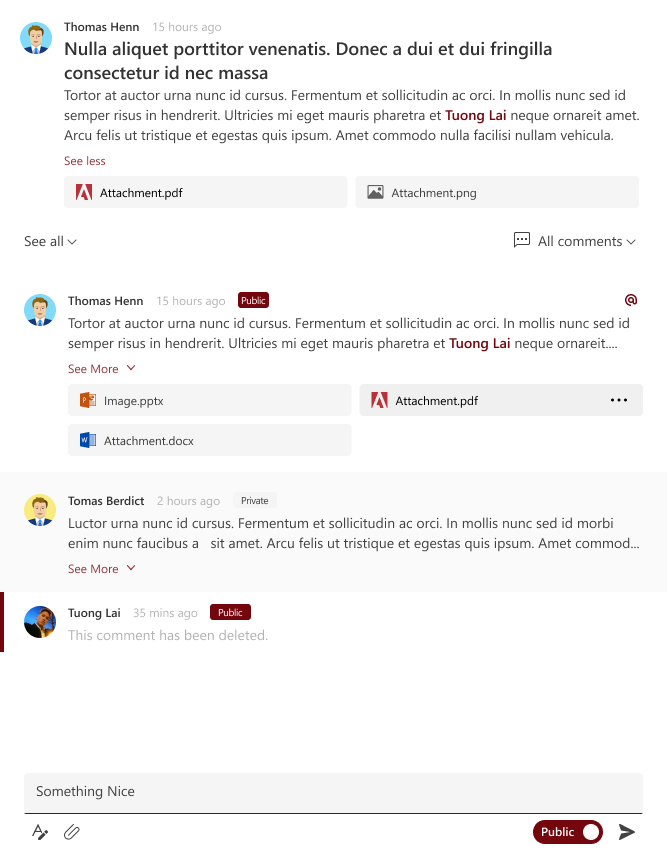
- The user’s information who is left comment.
- The time when that user is left comment.
- Type of comment (Private or Public).
- Content of comment.
The eHelpdesk Support Portal provide to you 2 choices to post a comment:
- Private comments are used to communicate between the members of Support Team so the Private Comments is only visible from the Support Portal and will be hidden on the Customer Portal.
- Public comments are used to communicate with customers, so the Public Comments is only visible from both Support Portal and Customer Portal.
To post a comment, follow the steps:
- Clicking on a ticket, the ticket detail displays the Overview tab.
- On the Comment,

- Select the Private toggle if you want only the users who is staff of Support portal can be seen.
- Select the Public toggle if you want to answer to customer.
- Enter a comment, the Send button is enabled.
- Click Send button.

By default, The Format Tool is not selected. After clicking Format Tool, the Editor will display:
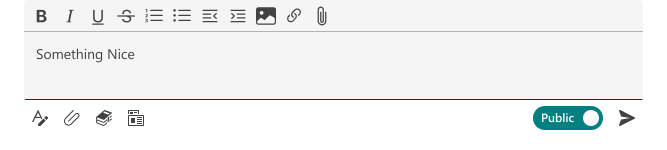
Hover over the icon on the editor, the tooltip will display:
- Bold
- Italic
- Underline
- Strikethrough
- Font Size
- Indent
- Outdent
- Bullet
- Number
- Font Color
- Text highlight color
- Link
- Remove Link
- Table
- Insert Image
- Code snippet
- Emoji -TBD
- Clear formatting
Add an Attachment
Next to the Editor button is the Attachment button. Click Attachment icon, a popup displays 2 options:
- Browser in channel.
- Upload from my computer.
To attach files in a comment, follow the steps:
- Clicked Attachment button next to the Editor button, a popup displays 2 options:
- Browser in channel.
- Upload from my computer.
- Select Upload from my computer a file picker will be opened to allow user to pick files. You can select one or more file(s) then click Open.
- Select Browser in channel a dialog will display with the files in the current channel. You can select one or more file(s) then click Upload.
- The selected file is displayed on comment.

To update a comment following the steps:
- Hover over a comment that your own, More Action icon will display on the top – right of comment.
- Click More Action → Edit, that comment changes to Edit Mode.
- Change content or type of comment then click Save, the comments are changed, and displayed “Edited.”
To delete a comment following the steps:
- Hover over your own comment, clicking More Action → Delete.
- Click Yes button on the Confirm pop up.
- The comment is deleted and displays “This message has been deleted.”!
Comment